


How to replace or install a mortice lock

How to replace or install a mortice lock
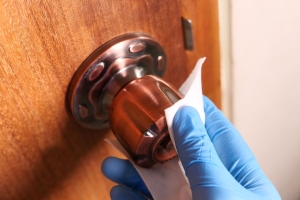
Mortice locks are commonly found in wooden doors in homes and commercial properties alike, particularly those with a bit of history. Whether your existing lock has worn out or you simply want to upgrade for better security, fitting a new mortice lock or replacing an old one is a manageable task with the right tools and a little patience. In this guide, we’ll walk you through the steps to replace a mortice sash lock or deadlock, ensuring a smooth and secure result.
What’s the difference between a mortice sash lock and a deadlock?
The two are very similar, however a sash lock adds one piece of extra functionality - it also incorporates the latch mechanism of a standard door handle. This gives you a choice when making your mortice lock purchase - if there’s already a handle in the door that you’re happy with, you can simply follow the steps to install a deadlock below (or above, if that works better for you) the existing handle.
To make it easy:
Deadlock - a locking mechanism that sits inside the door, with a keyhole on either side
Sash mortice lock - a standard door handle latch and a deadlock mechanism all in the same case
On the other hand, if the door doesn’t have a handle already, you can use a mortice sash lock and combine two jobs into one.
The only thing to note is that because a mortice sash is a much bigger piece of equipment, you might need slightly different tools in order to easily make the right size of hole.


How to Install a Mortice Lock From Scratch
If you’re installing a new wooden door that’s external-facing, or want to add extra security to part of your home, adding a mortice lock is a great idea. It’s an achievable task that’s only a little more complicated than installing a new latch, and many of the tools you’ll need are the same.
What You’ll Need:
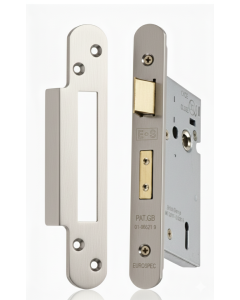
- Mortice lock (sash or deadlock)
- Tape measure and pencil
- Combination square
- Chisel and mallet
- Electric drill and wood bits
- Screwdrivers
- Safety goggles
- Masking tape
Step-by-Step Guide
1. Mark the Lock Position
Decide on the height for the lock—typically around 1 metre from the base of the door.
Use the lock case to mark its outline on the edge of the door.
2. Drill a Gap for the Mortice Pocket
Use a drill with a wood bit (usually 16–20mm depending on the lock size) to drill multiple holes along the outline you’ve just drawn onto the door.
Drill to the depth of the lock case - you can mark the correct depth on your drill bit using a piece of masking tape.
Use a chisel to neaten the mortice pocket and remove excess wood.
3. Cut the Faceplate Recess
Insert the lock into the mortice.
Draw around the faceplate.
Use the chisel to create a shallow recess so the faceplate sits flush with the door edge.
4. Mark and Drill for Keyhole (and Spindle if Sash Lock)
With the lock in place, mark the keyhole (and spindle hole) on each side of the door.
Drill through carefully, ideally from both sides to avoid splintering.
5. Screw the Lock in Place
Insert the lock case fully.
Secure it with screws through the faceplate.
6. Fit Handles or Escutcheons
Align and attach your handle set (for sash locks) or key escutcheons (for deadlocks) on both sides of the door.
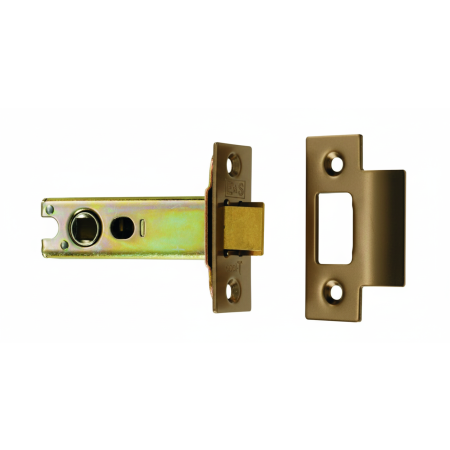
7. Fit the Strike Plate
Close the door gently and mark where the bolt meets the door frame.
Chisel out a recess and drill a receiving hole.
Screw the strike plate into place.
Test everything: latch alignment, key turning, and handle movement. A good fit means the bolt or latch glides cleanly without resistance.


How to replace a mortice lock
What You'll Need
Before you begin, gather the following tools and materials:
- New mortice lock (ensure it's the same size and type as your old one)
- Screwdriver (usually a flathead and/or Phillips)
- Chisel and mallet (for adjusting the mortice pocket if needed)
- Pencil
- Drill and wood drill bits
- Tape measure
- Safety goggles
- Wood filler (if the keyhole needs to be moved)
Step 1: Choose the Right Replacement
Start by removing your existing lock and measuring it. The key dimensions to match are:
Case depth (from the edge of the door to the back of the lock body)
Backset (from the edge of the door to the centre of the keyhole or handle spindle)
Faceplate size
Most mortice locks come in standard sizes (typically 64mm or 76mm case depth), but checking your old one against the replacement is crucial. Also, check whether your lock is a sash lock or a deadlock.
Step 2: Remove the Existing Lock
Unscrew the faceplate on the edge of the door.
Remove the handle or key escutcheons on both sides of the door.
Pull out the old lock case from the mortice pocket – it may need a little wiggling, which you can easily do by inserting a screwdriver into the keyhole on one side to use as a lever.
Remove any screws holding the strike plate on the door frame.
Step 3: Check the Fit
Slide the new mortice lock into the cavity. If it fits snugly, you’re in luck. If not:
Use a chisel and your drill to carefully enlarge the mortice pocket.
Adjust the faceplate area on the door edge if needed.
Make sure the lock body sits flush and square.
Step 4: Mark and Drill for New Keyhole or Handle
If the keyhole or spindle hole on the new lock doesn’t align with the old one:
Insert the lock and mark the new keyhole or spindle position on both sides of the door.
Remove the lock and drill new holes through the door using an appropriate-sized wood drill bit.
Take care to drill straight and avoid splitting the wood, and remember that you’ll need to fill in the old keyhole if there’s a significant difference in where the locks are.
Step 5: Fit the New Lock
Insert the lock case into the mortice cavity.
Secure the faceplate with screws.
Fit the handle or key escutcheons on either side of the door, lining them up with the spindle or keyhole.
Test the operation – the bolt and latch should move freely and the handle should return smoothly.
Step 6: Fit the Strike Plate
Close the door and mark where the latch and/or bolt meets the frame.
Position the strike plate accordingly and chisel out the recess if needed.
Drill out the latch/bolt holes in the frame.
Secure the strike plate with screws.
Test again to make sure the door closes firmly and locks securely.
Additional Tips
If you’re upgrading for better security, look for BS3621-rated mortice locks, which meet British Standards and are usually insurance-approved.
For timber doors, consider pairing your new lock with security escutcheons or a night latch for added protection.
Need the Right Tools and Hardware?
At Brass Works, we stock a wide range of mortice sash locks and deadlocks from trusted brands, along with handles, escutcheons, and everything else you need to complete the job. Browse our full range today or contact our team if you need help choosing the right lock.